
TL;DR
- Understanding firmware development is valuable for hardware engineers working on embedded systems. If you work in a team, you can reduce team efforts and perfect integration work with your fellow engineers.
- The best way to learn coding languages such as C/C++ and MicroPython is with a project of your own.
- You’ll need to select a microcontroller based on project requirements, such as low power consumption, wireless connectivity, or high-power sensors. The programming language choice will also affect your options for micro-controllers. Arduino and ESP are two great options.
- Select modules for your project, such as sensors or wireless connectivity modules.
- Test and debug your code using the IDE’s features.
- Always use version control software with your code. Ensure that comments and documentation is used to improve code readability.
Start small
Firmware engineering is the overlap of software and hardware engineering – hence the name. As such, we need to make decisions about the code (software), and the controller (hardware) we’ll use. The decisions you make and information you’ll need can be nicely separated into these two groups, so we’ve done the same with the format of this blog post.
First of all, it’s good to have a hobby project that would be fun for you to work on. This way you have a target to reach and you can always add features later on.
Start with something simple. This project is merely a vehicle for learning a bunch of new skills and concepts.
As an example, we made an environmental IoT device for our office in Taipei. Take a look at our code on Github! (aesthetic appeal wasn’t the point for this project and hey, that’s the most eco-friendly it can get!) – we’ll be posting a more detailed blog post on this project in the coming weeks.
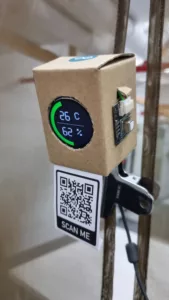
Readings for CO2 concentration, temperature and humidity in our Taipei office.
The controller (hardware)
The first decision you’ll need to make is the microcontroller unit (MCU) you’re going to use for the project.
Select your MCU based on your project’s requirements.
- Low power consumption for a battery-operated device?
- Wireless connectivity (GSM, LoRa, BLE)?
- Does any sensor require high-power or specific logic-level voltage?
The specific needs your project has will inform the MCU selection you make, so we can’t tell you which one to use. However, here are some popular ones and their main advantages and drawbacks:
Arduino boards

I always keep an Arduino MEGA on my desk for that occasional debug session. It’s a versatile board and very convenient for testing single sensors or modules before integrating them into an existing project.
The main advantage of this board is that it supports both 3.3V and 5V logic levels, making it compatible with most sensors available on the market. (for example, most ESP32 only support 3.3V logic level).
Pros
- Been on the market for years
- Proprietary IDE (Arduino IDE)
- Proprietary Cloud service
- Full of GPIOs
Cons
- Pricey
- Lower performance than its competitors
- Big form factor
- No built-in connectivity
If you plan on using Arduino, you can buy some well-designed boards from their shop.
ESP32 boards
Espressif has a wide range of chips that come with some cool stuff. It’s also cheaper than Arduino, and a lot of documentation is available for it.
Always double-check the model you buy: some of them may lack the functionality you need!
Pros
- Cheaper than its competitors
- Supports different coding languages
- Arduino C/C++ using the Arduino core for the ESP32
- Espressif IDF (IoT Development Framework)
- Micropython
- JavaScript
- LUA
- Built-in wireless connectivity (WiFi, BLE, Bluetooth)
- High performance
- Small form factor (check out the Qt Py!)
Cons
- Poor ADC accuracy
- Compatibility issues with some I2S devices
- Manufacturing location concerns

DFrobot offers a great board for the ESP32 with USB-C (today’s standard), battery charging and management circuitry in a smaller form factor compared to its competitor.
STMicro, Nordic
If you open an IoT device you most likely find one of these two chipset.
They both come from recognised manufacturers and can be pushed to the limit of “low power” definition.
On the other hand, the learning curve for these is much steeper than that of Arduino and ESP32. For that reason, I would not recommend them to someone just picking up firmware.
Raspberry Pi, NVIDIA Jetson
Machine learning and Artificial intelligence have gained interest in recent years. However, you’d need the computational power of a computer to run ML and AI algorithms. RPi and Jetson are just that, computers.
They run a fully scaled operating system and require a different programming approach. They really tend to serve projects which rely on their increased horsepower, which probably isn’t something we should be worried about when just getting started.
The code
Learn the basics
Most MCUs support C/C++, so this can be a good starting point. This is a robust coding language that has been around since the early 70s. Some MCUs also support MicroPython, which is especially handy if by chance you can already code in Python.
It’s well outside the scope of this article to explore programming. It’s important the one you chose fulfills the requirements you have for your project. Your choice of language will be informed by what you need to do with it.
It’s likely you don’t need a particularly deep understanding of whatever programming language you choose, so don’t be intimidated by the idea of “coding”. If you’ve chosen a simple project to get started with, you should be able to pick up all the knowledge you need online.
If you’ve chosen a microcontroller that only supports a few languages, obviously your decision will be limited by that.
Keep your code under version control
It’s crucial to keep revisions of your code and store them in an SVN repository.
This allows you to keep track of the changes you’ve made. This way, if something goes wrong you can revert back to an old save. It’ll also make the process of getting help from other programmers easier, as they’ll be able to go “back in time” and understand the changes you’ve made to the code. \

Github is probably the best to start from even though it does not have a graphic user interface.
It is free, however business licenses are also available.
TortoiseSVN makes for a perfect companion with Github. It allows you to have a simple graphical interface on windows explorer to manage the files in your repository.
Choose the IDE
An Integrated Development Environment is the tool between you and the MCU you plan on using.
The IDE gives us a friendly environment to write our code, regardless of the language we use.
Moreover, it lets us build (flash) the code to our chip and most importantly, it lets us read what the MCU is telling us and debug our code.
![]()
Arduino IDE features an intuitive interface, there are a good deal of tutorials, guides and videos based on it. You can’t go wrong with this one.
If you want to dig deeper, Visual Studio Code and its buddy PlatformIO are a great combo that has its advantages compared to Arduino IDE.
![]()
The downside here is that it takes longer to set up these tools and they’re less intuitive for beginners.
If you want to dig more on how to get started with an ESP32, the folks from RandomNerdTutorials made a detailed blog post.
Select your peripheral modules
Once you downloaded and installed the Arduino IDE and properly configured it to work with your board, you want to add features to your liking.
A few things to be aware of while selecting your sensor or module:
Power consumption.
Make sure that your MCU board has a regulator that can supply enough power to all the modules on your device. Also, if your project is battery powered, you may want to investigate different sensors that could have lower power consumption.
Logic levels.
As I mentioned before, this is mostly true for the ESP32. Make sure your sensor can match the logic level of your MCU.
Libraries and Documentation
Analog and Digital signals, I2C, SPI, I2S are supported natively by the MCU. To communicate with the sensor, your MCU will need a library.
I highly recommend buying modules from reliable vendors. Adafruit and Sparkfun for example always have your back with dedicated libraries and extensive documentation for their sensors.
From here, you can learn at your own pace.
Start building your own project, like the one you picked at the beginning of this article.
It must be something that you’re interested in: making learning fun will help you on this journey!